Robot Design Day 2
Saturday May 2 2009
AM - Finished designing, on paper, what the robot's exterior will look like
Afternoon - Rounded up some hardware and looked for parts for the skidder
Evening - Started creating 3-D solid models in Inventor
Here is the model I made of the motors I plan to use.

AM - Finished designing, on paper, what the robot's exterior will look like
Afternoon - Rounded up some hardware and looked for parts for the skidder
Evening - Started creating 3-D solid models in Inventor
Here is the model I made of the motors I plan to use.

Learned to BEND METAL !!!!!!!!!
Friday May 1 - Afternoon
I am so stoked!! Bruce from Dorkbots showed me how to use the finger brake to make a metal box! Evil cackle, rub hands with glee, I am now the master of the universe, bwahahaha! He's created a monster. This means that I can MAKE ROBOT BODIES really easily! Really nice ones. I am so stoked. I have been puzzling over the mysteries of sheet metal for many moons and along comes this really nice guy and not only shows me how to do it, but actually has the patience to actually stand around while I fumble through the entire process!! Wow! Thanks a zillion, Bruce, I owe 'ya. And thanks to Steamboat Ed and his freakin' fantabulous shop.
Here is the box I made.
Tools: Shear, notcher, Whitney punch, finger brake.
This is so awesome I am inclined to create a Instructable or something showing others how to achieve this miraculous result. Well, perhaps if I lie down for a while, the urge will pass.
I am so stoked!! Bruce from Dorkbots showed me how to use the finger brake to make a metal box! Evil cackle, rub hands with glee, I am now the master of the universe, bwahahaha! He's created a monster. This means that I can MAKE ROBOT BODIES really easily! Really nice ones. I am so stoked. I have been puzzling over the mysteries of sheet metal for many moons and along comes this really nice guy and not only shows me how to do it, but actually has the patience to actually stand around while I fumble through the entire process!! Wow! Thanks a zillion, Bruce, I owe 'ya. And thanks to Steamboat Ed and his freakin' fantabulous shop.
Here is the box I made.
Tools: Shear, notcher, Whitney punch, finger brake.
This is so awesome I am inclined to create a Instructable or something showing others how to achieve this miraculous result. Well, perhaps if I lie down for a while, the urge will pass.
Balloon Popping LEGO Robot
Friday May 1 2009 - AM

Jeronimo and I started on our robot for the balloon-popping maze today. I made a destructo weapon to pop the balloons. It's 4 pins pushed through a LEGO tire and then geared a little bit fast. Too much fun!!


Jeronimo and I started on our robot for the balloon-popping maze today. I made a destructo weapon to pop the balloons. It's 4 pins pushed through a LEGO tire and then geared a little bit fast. Too much fun!!

Programmed Hardware
Thursday Night after work April 20 2009
Ha! Programmed all three circuits and they pretty much worked the first time. Can I wire, or what? Presented to Steamboat Ed at the Dorkbots meeting, and we decided to go with the thumbwheel, or DigiSwitch, whatever you call it. These things are my new favorite input device.
Ha! Programmed all three circuits and they pretty much worked the first time. Can I wire, or what? Presented to Steamboat Ed at the Dorkbots meeting, and we decided to go with the thumbwheel, or DigiSwitch, whatever you call it. These things are my new favorite input device.
Wired prototype circuits
Tuesday night 28 April 2009
Finished wiring up 3 test circuits for next version of Steamboat Ed's Calliope. Total time = 4 hours.
DIP Switches - Use DIP switches to select songs - practice your binary numbers. Steamboat's idea -- but let's give him some more options...

Thumbwheel - My Favorite - Just dial in the song number you want

Up Down Button with 7-Segment LED Display - Push up or down to increment/decrement song number. Song number will display on 7 segment LEDs. (2 digits)

Damn good fun.
Next step - programming.
Finished wiring up 3 test circuits for next version of Steamboat Ed's Calliope. Total time = 4 hours.
DIP Switches - Use DIP switches to select songs - practice your binary numbers. Steamboat's idea -- but let's give him some more options...

Thumbwheel - My Favorite - Just dial in the song number you want

Up Down Button with 7-Segment LED Display - Push up or down to increment/decrement song number. Song number will display on 7 segment LEDs. (2 digits)

Damn good fun.
Next step - programming.
lost parts OH SO FRUSTRATING
Saturday 25 April 2009
I have lost the *@#! slide spring for my carburetor. Looked everywhere and even went back to work to see if I left it there. Can't figure out how a four inch spring could go missing.
Well, other than that SLIGHT detail, it's reassembled.
I have lost the *@#! slide spring for my carburetor. Looked everywhere and even went back to work to see if I left it there. Can't figure out how a four inch spring could go missing.
Well, other than that SLIGHT detail, it's reassembled.
LEGO robotics - whittling down our time
Friday 24 April 2009
Worked on LEGO robot for "Pit of Despair" contest. Or I should say, watched Jeronimo work on the robot. 'Cause he's the man. 10-4 or so. Knocked some hella time off, we got like ah twenty seconds faster through the Pit of Despair.
Worked on LEGO robot for "Pit of Despair" contest. Or I should say, watched Jeronimo work on the robot. 'Cause he's the man. 10-4 or so. Knocked some hella time off, we got like ah twenty seconds faster through the Pit of Despair.
moto/metal/PCB
Thursday 23 April 2009
AM - Took my carburetor apart, cleaned it, blew out all the jets.
Drained all the gas. It really stinks.
Day - Cut out gears at work.
Eve - Steamer has soldered most of the components into the PCB and it looks pretty cool.

AM - Took my carburetor apart, cleaned it, blew out all the jets.
Drained all the gas. It really stinks.
Day - Cut out gears at work.
Eve - Steamer has soldered most of the components into the PCB and it looks pretty cool.

Puzzle pieces at last
Wednesday April 22, 2009
Beautiful. Chips flying.
 Hot off the press -- I mean, the mill.
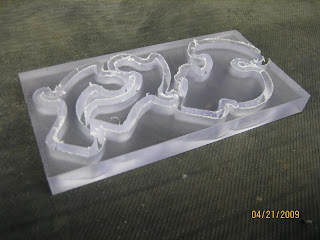 Here's one after being cleaned up.

Beautiful. Chips flying.
 Hot off the press -- I mean, the mill.
 Here's one after being cleaned up.
Fail Puzzle
Monday 20 April 2009
Finally got two puzzle pieces laid out, programmed, and cut -- alas, fail. Accidentally cut through the pieces with the toolpath and didn't notice it on the screen.
Haste makes waste...
 (but I still go as fast as possible)
Finally got two puzzle pieces laid out, programmed, and cut -- alas, fail. Accidentally cut through the pieces with the toolpath and didn't notice it on the screen.
Haste makes waste...
 (but I still go as fast as possible)
Makin' Bolts
Sunday April 19, 2009
Worked on my motorcycle. Hasn't run in 2 years. Bought/charged/installed battery, then started working on the rear brake mounting.
Somehow these bolts went missing and I need them for my motorcycle. Was going to order the proper thing and then it occurred to me I could "make do" by chopping off and then drilling a hole in a similar bolt. Need two bolts with particular shoulder and hole drilled for a cotter pin.
Motorcycles are particular, boy oh boy, the shoulder on the bolt fits exactly width wise and length into the brake drum bracket. So, it's NOT a permanent fix, and boy my old boss Charlie Craig would NOT approve :)
Before - Proper bolt in foreground, donor bolt in background

After - Hacksawed and drilled and looks pretty close, though shoulder diameter is too small.

Installed on the bike (photo only shows one of them).

Worked on my motorcycle. Hasn't run in 2 years. Bought/charged/installed battery, then started working on the rear brake mounting.
Somehow these bolts went missing and I need them for my motorcycle. Was going to order the proper thing and then it occurred to me I could "make do" by chopping off and then drilling a hole in a similar bolt. Need two bolts with particular shoulder and hole drilled for a cotter pin.
Motorcycles are particular, boy oh boy, the shoulder on the bolt fits exactly width wise and length into the brake drum bracket. So, it's NOT a permanent fix, and boy my old boss Charlie Craig would NOT approve :)
Before - Proper bolt in foreground, donor bolt in background

After - Hacksawed and drilled and looks pretty close, though shoulder diameter is too small.

Installed on the bike (photo only shows one of them).

Jank Mechanic's Rolling Chair
Sunday April 19, 2009
1 set casters, plus piece of wood, plus milk crate, plus cushion, plus shop rag = worst looking mechanic's seat ever. Beats just milk crate by itself, though.

Installing casters.

1 set casters, plus piece of wood, plus milk crate, plus cushion, plus shop rag = worst looking mechanic's seat ever. Beats just milk crate by itself, though.

Installing casters.

BinkyBot
Saturday March 18 2009
 Now that the great electronic reorg is complete, I can have some fun actually doing electronics. I did a rebuild on an old robot which I made back in 2001. The breadboard was torn up so I rewired and reprogrammed it. This is maybe the second robot I built from scratch. I have maybe one or two more robots like this that I would like to get running again.
Robot in disrepair.

Where old robot code lives.
This is my old computer, a Toshiba Libretto. Still works and was able to plug right in and program this robot.

 Now that the great electronic reorg is complete, I can have some fun actually doing electronics. I did a rebuild on an old robot which I made back in 2001. The breadboard was torn up so I rewired and reprogrammed it. This is maybe the second robot I built from scratch. I have maybe one or two more robots like this that I would like to get running again.
Robot in disrepair.

Where old robot code lives.
This is my old computer, a Toshiba Libretto. Still works and was able to plug right in and program this robot.

BigTrak
13 April 2009
Fixed up someone's BigTrak at work. This toy rocks, it's programmable. You use the keypad to enter distance and direction and it can execute 16 motions/actions in a row.

Cleaned battery connections with baking soda, glued axle back together (ok coworker did the glueing), battery connector for trailer broke so had to sort of solder weld it back together.
Fixed up someone's BigTrak at work. This toy rocks, it's programmable. You use the keypad to enter distance and direction and it can execute 16 motions/actions in a row.

Cleaned battery connections with baking soda, glued axle back together (ok coworker did the glueing), battery connector for trailer broke so had to sort of solder weld it back together.


The Great Electronics Reorg of 2009
March 30 - April 18, 2009
Decided all the electronics should live in the house, not in the garage.
First step -- Rearrange bedroom to accommodate giant cabinet of electronics.


Cleat with crossbars installed in cabinet.

Moved cabinet from garage to apartment with the help of my neighbor. Then actually gathered all the electronics from everywhere and sorted them in the cabinet (somewhat). Also I cleaned the garage while I was at it and got rid of some stuff including a cart that was really in the way. It's great now, I can work in there again. Before, I couldn't get to the workbench. Plus, removing the cabinet means finally a place to put the bandsaw.
The cabinet all put back together.

Contents of cabinet

Decided all the electronics should live in the house, not in the garage.
First step -- Rearrange bedroom to accommodate giant cabinet of electronics.

- First, took everything out of bedroom -- bed, desk, mattress, ...
- I split the desk apart and changed from "L" shape to straight shape after moving bed and desk to at least four configurations in a frenzy of "physical engineering". My usual is careful measurements and graph paper, or once I even tried Sketchup.
- Installed pegboard thingy.
- Installed curtain rods and hung up curtains.
- Installed a new phone jack. I broke the original by dropping a big piece of plywood on it.
- Installed new DSL modem which I got some months ago.
- Fixed my wireless connection, which hasn't functioned for oh so long.
- Installed and wired all the routers and cables and junk into the desk and tidied it all up.
- Moved two file cabinets into place.

Cleat with crossbars installed in cabinet.

Moved cabinet from garage to apartment with the help of my neighbor. Then actually gathered all the electronics from everywhere and sorted them in the cabinet (somewhat). Also I cleaned the garage while I was at it and got rid of some stuff including a cart that was really in the way. It's great now, I can work in there again. Before, I couldn't get to the workbench. Plus, removing the cabinet means finally a place to put the bandsaw.
The cabinet all put back together.

Contents of cabinet


Subscribe to:
Posts (Atom)